Aug 6, 2009

Currant mystery

"A currant is a different variety of a raisin, right?" I would have answered in positive to the question. That is until Ezekiel J. Emanual wrote about them in the Atlantic, "I was told that we ignoramuses ... often confuse currants with Zante grape raisins. However, grapes are fruit that come from vines. Currants are berries that come from shrubs. Currants are only found in the Northern Hemisphere."

More about them at Wikipedia.

Jul 2, 2009

Ukadiche Modak

While I eat everything sweet, nothing compares to the pleasures of Ukadiche Modak! And nothing compares to those that my mom makes, weather in taste or aesthetics. Unfortunately, a busy schedule meant that they were made only on the occasion of Ganesh Chaturthi. And we (mostly my dad and me) made sure we made the most of it! My Modak eating capabilities always amazed my mom, who worried about my everyday food intake. But that is a different story.

For now here is my mom's perfected recipe.

Ingredients
  • 1 cup fine rice flour
  • 1 1/4 cups water
  • 2 cups grated coconut
  • 1 1/2 cups grated jaggery
  • 1/4 cup raisins (optional)
  • 2 tbsp ghee
  • A pinch of salt
  • 1 tsp cooking oil
  • 1-2 finely grounded cardamom pods
Method
Ukad: According to my mom, making a perfect ukad is in getting the timing right. So make sure to have a clock nearby. Add salt and cooking oil to 1 1/4 cups water and bring it to boil . When it starts boiling add the rice flour and poke it so that water seeps up through those holes. Let it boil well for 3 minutes. Then turn off the heat and place a lid on the vessel. Let it stay for around 4 minutes. Then stir it well, so that all the water and flour are mixed well. Close the lid again and let it cool. When it has cooled enough to touch, knead the ukad so that there are no lumps. Use water (just enough to wet your hand) if necessary. Set aside the ukad. Letting the ukad sit for a couple of hours makes the modaks softer.

Saran: Heat ghee in a skillet and add cardamom to it. Then add the grated coconut and stir for a few minutes. Mix in the jaggery and raisins, and stir so as to make it dry. Make sure to stir the mixture so that it does not stick to the bottom of the skillet. The saran should not be very dry as it will tear the covering. A standard measure would be to let it dry till the spoon can stand straight in it.

Modak: Oil your palms slightly. Take a small ball of the ukad and flatten it out gently and evenly. For beginners it is not necessary to flatten it out real thin, as handling a thinner papadi takes practice and precision. The intent here is to make small bowls with petal-like pattern. For this pinch the sides of the flattened out ukad. Add a spoonful (or as per size) of saran to this and gently close the petals while retaining their shape, so that the resulting shape is like a whole garlic. (See picture above.) Keep the modak wrapped in a soft moist cloth. Repeat for the remainder of the ukad.

Now take a pressure cooker or steamer vessel and line it with a soft moist cloth (a handkerchief works well.) Place the modaks in such vessel and cover them with remainder of the cloth. Now take sufficient water in the cooker or steamer and place the vessel in it. Steam it covered (without the whistle) for 10 minutes to the clock.

Serve hot modaks with ghee and enjoy a meal worthy of Gods.

May 27, 2009

May 18, 2009

Veggie patties

Anyone who has had a veggie/garden burger in the US would agree that they come as bland as bland could be. Infact the french fries are tastier than the burger. And so my mind wanders to the burgers mom made at home, or even the ones you get at Pune's Burger King. I have tried various versions of the veggie patties and some time back even had them as burgers with Whole Wheat English Muffins, some onions and tomatoes. And they packed more flavor than any of those you have to settle for at restaurants. You can even serve them as appetizers or snack with tea on a rainy day.


Ingredients
  • 2 medium sized potatoes
  • 1/2 cup grated onion
  • 1 cup grated carrot
  • 1/2 cup grated beetroot
  • 1/2 cup green peas
  • 1/2 cup chopped cabbage
  • 2-3 cloves minced garlic
  • 2-3 finely chopped chilies (more if you like it really hot!)
  • 1/4 cup chopped Coriander/cilantro
  • 1 tsp garam masala (optional)
  • 1 tbsp lemon juice
  • Salt and pepper to taste
  • Some Rava/soji to dip the pattie in
Method
Pressure cook the potatoes. Also microwave the green peas for around 3-4 minutes so that they are soft. In a mixing bowl mix the grated carrots, beetroot, onion, cabbage and peas. (You can easily add or subtract any vegetables you prefer. I sometimes make these to finish off those small portions of leftover vegetables, and it works just as well.) Now add garlic, chilies, garam masal, coriander, salt, pepper and lemon juice. Mix it well. Then mash in the cooked potatoes and knead the mixture. If you intend to use these as patties for burgers, you might want to add more of all the spices, so that the flavors come through the bread just as well. Since I do not like things too hot, these proportions work perfectly for me even in a burger.

Now make medium sized flat balls of the dough and roll them in the rava/soji. In a pan sprinkle some oil, and pan fry the patties on medium heat until they are golden brown on each side. Since the veggies are mostly uncooked, frying them on medium heat will cook the veggies well at the same time not burning them. Another way to cook the patties (particularly if you are making them for more than four people) is to place them on a baking sheet. Brush both sides with some oil and bake them at 300 degrees for around 15 minutes or until the crust is golden brown. Serve with some hot and spicy tomato ketchup and a cup of hot tea!

May 1, 2009

Fig n' Raisin muffin

As a kid I remember enjoying cupcakes (vati-cake) from the corner bakery. But over the years the quality reduced and it became a rarity in our house. However, the fascination for those soft and spongy no-fuss cupcakes continued. With continental changes, vocabulary changed and now those cupcakes have becomes muffins. So as I baked my first batch of muffins, childhood memories of that quick walk to the bakery with my dad, the excitement of finding a cupcake in the tiffin... came rushing back. And the fact that I was making them for a little girl made them even more special.

The recipe has been adapted from 'Food Network' to work with ingredients I already had, and the blueberries have been substituted with figs and raisins. This recipe makes eight muffins.

Ingredients2
  • 3/4 of a stick unsalted butter
  • 3/4 cup sugar
  • 2 large eggs
  • 1/2 cup sour cream
  • 1/8 cup milk
  • 1 1/4 cup all purpose flour
  • 2 tsp baking powder
  • Pinch of salt
  • 1/4 cup fig puree or jam
  • 1/4 cup raisins
  • 8 muffin liners
Method

Soak 1/4 cup raisins in water. Preheat oven to 350 degrees.

In a mixing bowl cream butter and sugar so that it is light and fluffy. If you are using fig jam you could reduce the amount of sugar to suit your taste. Now add one egg at a time and mix well. Then continue to mix in the sour cream and milk. After that sieve the flour, baking powder and salt. Add this to the wet ingredients. Make sure to mix it well so that no lumps remain. Now fold in the fig jam/puree. Also drain the raisins and fold them into the mixture gently. (You may choose to use other nuts or fresh fruits instead of the figs and raisins. They all taste equally amazing.)

Fill the muffin liners to the brink with batter. Bake for 20-25 minutes until golden brown, or till a toothpick inserted in the middle comes out clean. Enjoy your delicious warm muffin with milk or coffee.

Apr 20, 2009

Mango Cheesecake

I believe if you are a summer baby away from home (India) during mango season, a mango delicacy on your birthday surpasses any other lavish celebration you could have. And so the mango cheesecake, decadent as decadent could ever be, was my husband's b'day gift this year. I adapted the recipe from the 'New York Times Dessert Cookbook by Nigella Lawson', and it was the best cake I ever baked.


Ingredients
  • 3 large eggs
  • 3/4 pounds cream cheese
  • 1 cups mango puree or 2 mangoes
  • 1/2 cup fine sugar
  • 1 tbps lime juice
  • 1 9 inch crust (I used the pre-made crust available in stores, but you could make it at home)
  • Icing and whipped cream for decorative purposes.
Method

Preheat oven at 325 degrees. Cut, peel and puree mangoes in a mixer or food processor. If mangoes are not readily, use canned puree. Since I am very picky about mangoes, I used the canned Alphonso mango puree you find in Indian grocery stores in the US. The flavor of the Alphonso makes the cake extra special. But you may choose to use any other type of mango.

Add the cream cheese to the puree and blend until smooth. I usually mix cake batter by hand, but it is necessary to use a mixer or food processor for this one due to the cream cheese that cannot be blended as well by hand. Once the cream cheese is smooth add the sugar and lime juice and blend further. Then add the eggs one at a time and mix it to a fine batter. The batter would not be as thick as regular cake batter, since we do not use any flour for this cake.

Pour the mixture in the crust and fill it up to the brim. This cake does not rise like a regular cake would, and sinks as it cools. Do not remove the aluminum foil around the crust since it is to be placed in a deep baking pan filled with hot water to about half way to the crust. Bake for about 50-55 minutes. Remove the cake from its water bath and let it cool completely. The cake will sink along the way. Once cooled, refrigerate it overnight or around 9-10 hours. The aluminum foil is easier to remove when the cake has been refrigerated.

You may use icing for decoration. I prefer not to. For well defined slices dip the knife in cold water before cutting. Serve the cake with some whipped cream on top and experience bliss.

Mar 5, 2009

Navratna Kurma

It can be difficult to come up with something new each time for frequent guests. I don't feel good repeating dishes, and it also gives me an reason to try out something new. So this time I decided to make one of my favorites, Navaratna Kurma. Kurma is generally believed to mean a slowly cooked curry. In the West it is used to mean a mild curry made with cream and dry fruits, but in southern India one can find examples of spicy kurmas. It has a rich creamy taste leaning slightly to the sweeter side, yet nothing you cannot make up for with a raita or dal. Also with the amount of vegetables that go into it, it is rather healthy.

This particular recipe is my version of the dish, and you can find many variations of it elsewhere online.

Ingredients
  • 3 medium tomatoes (pureed)
  • 1 onion (finely chopped)
  • 2 medium potatoes
  • 1/2 cup green beans
  • 1/2 cup carrots
  • 1/2 capsicum (green, red, yellow - whichever you like)
  • 1/2 cup cauliflower
  • 1/3 cup green peas
  • 1/4 cup of (kasuri) meethi
  • 1/2 cut paneer
  • 1/4 cup of cashews + almonds + raisins
  • 1 cup milk
  • 2-3 tsp garam masala
  • 1 tsp turmeric
  • 1-2 tsp red chilli powder (more if you like it spicy)
  • t tsp coriander powder
  • 1-2 tsp garlic
  • 1-2 tsp ginger
  • 2-3 cloves
  • A pinch of cardamom
  • 2-3 small pieces of Cinnamon
  • 1 bay leaf
  • 1 tbsp ghee
  • 3 tbsp oil
  • Some coriander
  • Salt
Method

Boil tomatoes till their skin is tender. Peal of skin to make puree. Add a quarter of the onion and some cashews into the mixer while making the puree. Heat oil in a skillet and add the cloves, cardamom, Cinnamon, bay leaf and dry fruits to it. Because the curry is slightly sweet, this mixture gives it the sweet n' spicy flavor without the sweetness. Then add ginger, garlic, coriander powder and turmeric. Fry the remainder of the onions till they are golden brown. Now add the puree and let it cook covered for a couple of minutes.

In another pan shallow fry cubes of paneer and set them aside. Once the puree starts to boil add the milk and let it come to a boil. You can also add some cream to make the curry richer. At this time add the garam masala and red chilli powder. Then add the vegetables. If necessary add some water or milk to help the vegetables cook. You can steam you vegetables in advance, but I like to cook them in the puree so that they take in all the spices and flavors.Once the vegetables are tender and the curry has thickened, add the fried panner and let it cook for another couple of minutes. Add salt to taste. And a pinch of sugar to balance it all.

Sprinkle coriander on the Navaratna Kurma and serve hot with poli, puri or naan.

Feb 26, 2009

Naralachi amba wadi

Mangoes are hard to come by in this part of the country, and there are times when you just crave for that divine taste of the Alphonso mango. So when we spotted a can of Alphonso mango pulp it was hard to resist. And from there began the quest to make the perfect Amba wadi. But then we could not find any khava, and making some at home even with (cow's) whole milk would have been difficult. Hence the improvised Naralachi Amba Wadi for those of us who want the taste, but cannot find all the ingredients.

Ingredients
  • 2 cups mango pulp
  • 2 cups grated coconut (as finely grated as possible)
  • 1/4 cup condensed milk
  • 1 small potato (mashed)
  • 2-3 tbs ghee
  • A pinch of cardamom
Method

Heat 2-3 tbs of ghee in a skillet and add a pinch of cardamom to it. Then add 2 cups of grated coconut and fry it for a minute. Add the mango pulp and condensed milk and mix it in well. The condensed milk gives the wadi a semblance of khava, and is an attempt to fool the senses. Now add the mashed potato and fold it in. The potato will act as a base to hold the wadi together which has a lot of liquid in the form of mango pulp. Since the mango pulp and condensed milk are usually sweetened, it is not necessary to add any more sugar to the wadi.

Keep stirring continuously on medium heat to keep it from sticking to the skillet and speeding the drying process. The mixture needs to be reduced until the spatula stands in it. You can feel the mixture getting heavier and difficult to stir as it thickens.

Now spread out the mixture on a greased cookie tray or plate. I like to line the tray with aluminium foil to avoid greasing, and also because it makes cleaning so much more easier. Spread out the mixture evenly while it is still warm and allow it to cool down completely before cutting. Cut the mixture into squares of your desired serving size. Always store the wadi in a fridge. The wadi, especially straight out of the fridge, makes an extremely satisfying snack or mini dessert.

Jan 22, 2009

Puran Poli

There are very few people who can resist piping hot Puranpoli with ghee. That incredible aroma is one of festivities, of happiness and memories. It is the smell of sheer bliss of being with your family, people you love. And when you are trying to create a home away from home, that smell can work wonders.

So it was about time I made the Puranpoli myself. The idea was scary at first considering that it had to match up to my mom's Puranpoli for me to be satisfied. And in spite of using the same recipe it isn't really the same. I guess it can never be!


Anyhow. The recipe is considerably time consuming and tiring, but totally worth it.

Ingredients

For the Puran
  • 2 cups chana/harbara dal
  • 4 1/2 cups water
  • 2 cups jaggery
  • 1/6 to 1/5 cup sugar
  • A pinch of turmeric
  • 1 tabelspoon oil
  • Nutmeg for seasoning
For the covering
  • 1 1/2 cups wheat flour
  • 1/6 cup all purpose flour/maida
  • A pinch of salt
  • Oil
Method

Pressure cook 2 cups chana dal with 4 1/2 cups of water. Add a pinch of turmeric and oil while cooking it. Take 3-4 whistles or as many as are needed to cook the dal well. Strain the dal so that no water remains. Retain the water as it can be used to make katachi amti. Mash the dal to as fine a paste as possible. I do this as I do not have a puranyantra here, and the mixer does not do the job. The puranyantra is used after you have added the jaggery, but since it is difficult to get all the equipment outside of India I mash the dal and then knead it at the end too.

Now heat some ghee in a skillet and add the mashed dal to it. Also add the jaggery and sugar and stir continuously. Make sure that the mixture does not stick to the bottom as the burnt smell will spoil the desired aroma. Keep stirring till the Puran is dry and thick. Also add some nutmeg to it. Let the puran cool. Knead it upon cooling so that it does not have any hard parts in it. The puran has to be consistently soft, as any hard part can tear the covering.

For the covering mix the wheat and all purpose flour with water and oil. Knead the so that it is soft and almost sticky. Use oil generously when kneading the dough and let it rest for at least an hour. The more the dough rests the better.

When making the actual poli take a small portion of the dough and knead it again. Roll it out in a small circle. Take a bigger portion of the puran and close it inside the dough as if wrapping a ball. Close the dough so that the puran does not comes out from anywhere. Now roll out the ball gently into thin roti using rice flour. It is important to roll gently as the puran can come out due to excess pressure. It is common that the poli tears when we are new at it.

Heat a griddle and roast the puranpoli on medium flame until it is golden brown on both sides. Serve with ghee and experience bliss!

Jan 16, 2009

Sheera

If there was dish that my whole family loved, sheera would win hands down. It is a delicious quick fix to warm your winter evenings, sunday mornings or anytime you like.


Ingredients
  • 2 cups rava/soji
  • 1 3/4 cup sugar
  • 2 cups water
  • 2 cups milk
  • 2 tablespoon ghee or oil
  • A pinch of salt
  • Some cardamon
  • Raisins and/or cashews to garnish (optional)
Method

Heat ghee or oil in a skillet. Add some cardamom seeds and cashews to it and let it fry till light brown. Then add the rava and fry on low flame till it is light pinkish brown. Add a pinch of salt to it too. At the same time bring two cups of water and milk to boil together. You could add the raisins to the mixture, or add them to the sheera later.

Once the rava is light brown and the water-milk mixture is boiled, pour the mixture into the rava and stir continuously. Make sure that no lumps remain. Be careful while stirring the mixture as the boiling rava can jump out on your hand. Then add the sugar and continue to stir till the mixture starts drying up. Cover the skillet and let it steam on low flame for a minute. Serve the sheera with lemon pickel and a nice hot cup of tea.

Jan 13, 2009

Kasuri methi paratha

There is a couplet in Marathi with begins with "Bhajit bhaji methichi..." And methi or fenugreek is a difficult vegetable to deal with. It takes a lot of time to clean and shrinks dramatically when you cook it. But it also extremely healthy, filled with potassium, calcium, iron and said to protect against some cancers.

One of my favorite fenugreek recipes is the methi paratha. While fresh methi would be ideal, since I hate the cleaning part in it I prefer using Kasuri Methi. This is nothing but dried fenugreek leaves. They are easily available in any Indian grocery store and smell as good as the fresh ones.

Ingredients
  • 1/2 cup Kasuri methi
  • 2 cups wheat flour
  • 2 garlic cloves finely chopped
  • 1 teaspoon Ajwain
  • 1/2 teaspoon turmeric
  • Salt to taste
  • Red chili powder to taste (optional)
Method

Soak the methi for 30-40 minutes. Mix the flour, methi, garlic, ajwain, turmeric and salt into a dough. The dough should be soft but not sticky. Roll out the dough evenly in small circles making sure that the edges are not too thick. Fry the parathas on a pre-heated griddle/tava. While you can brush some oil on the paratha, I prefer to use ghee or butter after taking it off the tava instead of using it while on the tava. This also helps them stay soft longer. Serve the parathas with yogurt or pickel.

Jan 7, 2009

In search of the perfect kadhai

Since our only kadhai retired, we have searched stores online and off for a replacement. But nothing seems to fit the bill (and the couple that did, didn't fit the pocket). I doubt we would have to think about buying a kadhai for more than a minute in India.

Anyhow. The problem is that I need something for deep frying, the Indian way. The other skillets in my kitchen are good for everything else, including shallow pan frying. The bottom is an issue. I would like a round bottom kadhai, something that makes the deep frying more convenient. And non non-stick. But then I am skeptical of those steel skillets in the market, or the woks used for Asian cooking. The woks don't seem thick enough for frying level temperatures, and at the same time rather bulky in terms of balance.

So if you can tell me where I can get the kadhai for purposes of Indian cooking, particularly deep frying that would be a lot of help. It could be a store in the U.S. or somewhere online. Looking forward to some insights.

Jan 4, 2009

Kakatcurry

Until I left Pune more than two years ago, I hardly ever cooked anything by myself. With my mom and elder sister around I did not have to bother with cooking anything substantial. All I did was 'help' my mom cook, either cutting veggies, making raitas or some such stuff.

With my sister's wedding I finally ended up cooking any significant amount of food. And to my surprise I was a decent enough cook. Over the last two years I have developed my skills experimenting successfully with different types of food. With my husband as a foodie and an excellent cook, we have tasted some of the finest foods between home and restaurants (and put on a few calories too!)

This blog is a chronicle of my experiments, a diary of my recipes. I guess I could hand it over to my grandchildren someday ;)


Beet and Carrot Wadi

As you will realize a few posts down that I have a huge sweet-tooth. And so it was an obvious choice for me to inaugurate this blog with a 'wadi' that is simple, delicious and nutritious - the Beet and Carrot Wadi!

Ingredients
3 1/2 cups grated carrot
3 1/2 cups grated beetroot
1 mashed potato
1/2 cup grated coconut
1/4 cup condensed milk
1/2 cup whole milk
1 1/4 cups sugar
2 teaspoons ghee
A few green cardamoms seeds

Method

Take two teaspoons of ghee in a skillet. Put in the cardamom seeds once the ghee is hot. Then add the grated coconut and stir it till it is a very light brown. Add the grated carrots and beet to the skillet and stir till they appear to be shrinking. Pour in the condensed milk, whole milk, and sugar and mix it well. Due to the inherent sweetness of the beet and carrots this recipe requires very little sugar as compared to many other sweets. You can further reduce the quantity of sugar from the suggested 1 1/4 cup to one cup according to taste.

When stirring make sure that the mixture does not stick to the pan. The burnt smell can spoil the smell and flavor of the wadi. After about 8-10 minutes add the mashed potato and mix it well. The potato is necessary to hold the mixture together. The mixture will now appear to be almost liquid and requires to be cooked until it is just about dry. The consistency of the mixture should be only a little dryer than the regular 'halwa'. During the entire process do not use a lid as it will slow down the evaporation process.

Now take a baking tray and grease it with ghee or oil. Then transfer the mixture to it and flatten it out evenly. Set it to cool. Once the wadi is completely cooled off and appears dry, cut it into squares and serve.


Upama

It is difficult to resist the quick fix snacks and meals especially when your living by yourself. But if you are health conscious you might not want to resort to the two-minute noodles or the frozen meals for long. So to our rescue is the Indian cuisine that offers a range of quick hot meal options.

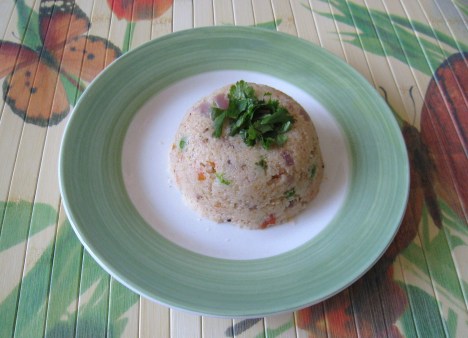
We shall go into all of those as we go along the way. Today I shall being with one of my favorites, Upama. This dish is made of 'rava' or 'soji' which itself offers you three to four different dishes that take no more than a maximum of 30 minutes. While Upama can be made in various ways I shall give you the typical Marathi version.

Ingredients

  • 1 cup rava/soji
  • 1 cup water
  • 1 cup milk
  • 1/2 medium sized onion
  • 1 small tomato
  • 3 tablespoons ghee/oil
  • 2-3 chopped green chilies
  • 1/5 cup green peas
  • Approx. 1 inch finely cut ginger
  • 1 table spoon udad dal
  • 4-5 curry leaves
  • Coriander to garnish
  • Lemon to taste

Method

Heat one tablespoon of ghee/oil in a skillet. Add rava to it and fry on low flame until it is a very light brown. This stage is very important as a rightly fried rava sets the stage for a delicious and 'khamanga' Upama. Apparently it also reduces the chances of acidity after eating if you are prone to acidity caused by rava.

Once it is light brown set aside the rava and heat 2 tablespoons of ghee/oil in a skillet. Add chillies, ginger, curry leaves, udad dal and jeera to it. The add the chopped onion and fry till it is a light pink and seems transparent. Now add the chopped tomato and let it cook for a minute. Do not overcook the tomatoes as it would tun into a paste and give the dish a red color. We want to see tomato pieces at the end.

Now it is time to add the water and milk to the skillet. Some use only water, but I like to use some milk to give it that rich texture. Add salt to taste. It is better to add salt at this stage so that it mixes well. Once the mixture is about to boil add the peas. As peas are very easy to cook adding them at such a late stage helps them stay green. When the mixture starts boiling add the rava and stir such that no lumps remain. You should be very careful here as some boiling rava might jump out at your hand as you stir. You could use a lid for shielding yourself. So stir the rava well removing lumps till all the water is dried up.

Add the coriander and let it stay on low flame with the lid on. Turn off the gas after about a minute, squeeze some lemon for additional taste and enjoy!